ResNet Quantization and Inference Execution with DPU IP and Vitis AI
Introduction
This is a memo outlining the basic steps to run a DNN model using Vitis AI and Zynq MPSoC, as I had forgotten many details after a long break. It’s easy to forget FPGA-related procedures each time.
Also, it seems that Transformer models are not yet supported by the DPU IP. I prefer not to write HLS, so please support Transformers soon!
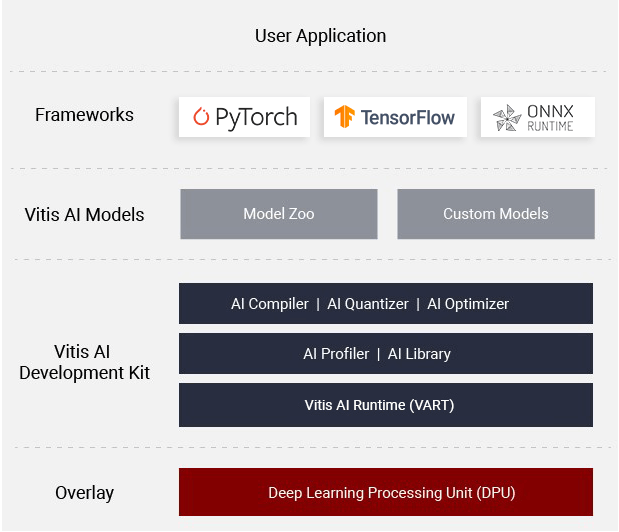
Following the former Xilinx tutorials, a ResNet model created with PyTorch is quantized from fp32 to int8, then deployed for inference on the DPU IP in the KV260. If you can achieve this basic flow, you can easily swap models at runtime on the FPGA by just changing the model and modifying application C++ files.
Reference tutorial:
Environment
- FPGA: AMD KV260 Zynq MPSoC US+
- Host PC: WSL2 Ubuntu 22.04
- Development environment:
- Vivado ML edition 2022.1 Linux version
- Vitis AI 3.0
Preparation on Host PC (Vitis AI)
- Clone Vitis AI and build the docker environment.
- Model quantization and cross-compilation are executed in the Vitis AI Docker environment.
mkdir hoge
cd hoge
git clone -b 3.0 https://github.com/Xilinx/Vitis-AI
cd Vitis-AI/docker
./docker_build.sh -t gpu -f pytorch
docker image ls
If you see the following after docker image ls, it is successful:
REPOSITORY                    TAG           IMAGE ID       CREATED          SIZE
xilinx/vitis-ai-pytorch-gpu   3.0.0.001     84ac11abb002   38 seconds ago   16.5GB
xilinx/vitis-ai-pytorch-gpu   latest        84ac11abb002   38 seconds ago   16.5GB
xiinx/vitis-ai-gpu-base       latest        bb7e8c8bff9a   17 minutes ago   5.99GB
Run the Docker environment using docker_run.sh from ./VitisAI. Using regular docker run within VitisAI/docker doesn’t automatically mount the host filesystem. You could manually configure mounts, but this method is simpler.
Activate the existing Anaconda environment within Docker. At this point, the Host PC setup is complete.
cd ..  # Back to ./VitisAI
./docker_run.sh xilinx/vitis-ai-pytorch-gpu:3.0.0.001
conda activate vitis-ai-pytorch
FPGA (KV260) Vitis AI Preparation
To simplify, download and flash the official pre-built SD card image provided by Xilinx. Download the image for your target device here:
The downloaded image includes Petalinux2022.1 with pre-built Vivado bitstreams containing DPU IP. Vitis AI is also pre-installed. If customizing your hardware or DPU IP, refer to the following articles:
After setup, connect to the FPGA using a serial connection (e.g., TeraTerm with USB microB, baud rate 115200). Confirm the contents on the FPGA:
root@xilinx-kv260-starterkit-20222:~# ls
Vitis-AI
dpu_sw_optimize
The FPGA preparation is complete. Transfer quantized models via tools like WinSCP to run inference.
ResNet50 Quantization and Cross-Compilation
Return to Host PC and gather necessary files.
Obtain ResNet50 Model
Get the fp32 ResNet50 model:
cd /workspace
wget https://www.xilinx.com/bin/public/openDownload?filename=resnet50-zcu102_zcu104_kv260-r3.0.0.tar.gz -O resnet50-zcu102_zcu104_kv260-r3.0.0.tar.gz
tar -xzvf resnet50-zcu102_zcu104_kv260-r3.0.0.tar.gz
mkdir -p resnet18/model
Obtain Calibration Data for Quantization
Obtain ImageNet 1000 for calibration:
cd resnet18
unzip archive.zip
Obtain ResNet Model in Docker Environment
Launch Docker environment. GPU environment is recommended as it significantly speeds up quantization:
Install Docker CUDA Toolkit first if using GPU environment:
distribution=$(. /etc/os-release;echo $ID$VERSION_ID)
curl -s -L https://nvidia.github.io/nvidia-docker/gpgkey | sudo apt-key add -
curl -s -L https://nvidia.github.io/nvidia-docker/$distribution/nvidia-docker.list | sudo tee /etc/apt/sources.list.d/nvidia-docker.list
sudo apt-get update
sudo apt-get install -y nvidia-docker2
sudo systemctl restart docker
Enter Docker:
./docker_run.sh xilinx/vitis-ai-pytorch-gpu:3.0.0.001
conda activate vitis-ai-pytorch
Confirm /resnet18 exists under /workspace.
Obtain the fp32 .pth ResNet model:
cd resnet18/model
wget https://download.pytorch.org/models/resnet18-5c106cde.pth -O resnet18.pth
cd ..
cp ../src/vai_quantizer/vai_q_pytorch/example/resnet18_quant.py ./
Check pre-quantization accuracy:
python resnet18_quant.py --quant_mode float --data_dir imagenet-mini --model_dir model
Results:
top-1 / top-5 accuracy: 69.9975 / 88.7586
Check compatibility with DPU architecture (DPUCZDX8G_ISA1_B4096):
python resnet18_quant.py --quant_mode float --inspect --target DPUCZDX8G_ISA1_B4096 --model_dir model
Quantization and Verification of ResNet50
Quantize using the following command:
python resnet18_quant.py --quant_mode calib --data_dir imagenet-mini --model_dir model --subset_len 200
cd quantize_result
Check if ResNet.py and quant_info.json files are generated. The quantization information is stored here:
- quant_info.json
{
  "param":
  {
    "ResNet::conv1.weight":[[8,8]],
    "ResNet::conv1.bias":[[8,7]],
    "ResNet::layer1.0.conv1.weight":[[8,8]],
    "ResNet::layer1.0.conv1.bias":[[8,6]],
    "ResNet::layer1.0.conv2.weight":[[8,8]],
    "ResNet::layer1.0.conv2.bias":[[8,6]],
    "ResNet::layer1.1.conv1.weight":[[8,8]],
    "ResNet::layer1.1.conv1.bias":[[8,6]],
    "ResNet::layer1.1.conv2.weight":[[8,8]],
    "ResNet::layer1.1.conv2.bias":[[8,6]],
    "ResNet::layer2.0.conv1.weight":[[8,9]],
    "ResNet::layer2.0.conv1.bias":[[8,7]],
    "ResNet::layer2.0.conv2.weight":[[8,8]],
    "ResNet::layer2.0.conv2.bias":[[8,6]],
    "ResNet::layer2.0.downsample.0.weight":[[8,7]],
    "ResNet::layer2.0.downsample.0.bias":[[8,6]],
    "ResNet::layer2.1.conv1.weight":[[8,8]],
    "ResNet::layer2.1.conv1.bias":[[8,7]],
    "ResNet::layer2.1.conv2.weight":[[8,8]],
    "ResNet::layer2.1.conv2.bias":[[8,6]],
    "ResNet::layer3.0.conv1.weight":[[8,9]],
    "ResNet::layer3.0.conv1.bias":[[8,7]],
    "ResNet::layer3.0.conv2.weight":[[8,9]],
    "ResNet::layer3.0.conv2.bias":[[8,7]],
    "ResNet::layer3.0.downsample.0.weight":[[8,9]],
    "ResNet::layer3.0.downsample.0.bias":[[8,8]],
    "ResNet::layer3.1.conv1.weight":[[8,9]],
    "ResNet::layer3.1.conv1.bias":[[8,7]],
    "ResNet::layer3.1.conv2.weight":[[8,8]],
    "ResNet::layer3.1.conv2.bias":[[8,6]],
    "ResNet::layer4.0.conv1.weight":[[8,9]],
    "ResNet::layer4.0.conv1.bias":[[8,7]],
    "ResNet::layer4.0.conv2.weight":[[8,8]],
    "ResNet::layer4.0.conv2.bias":[[8,6]],
    "ResNet::layer4.0.downsample.0.weight":[[8,7]],
    "ResNet::layer4.0.downsample.0.bias":[[8,7]],
    "ResNet::layer4.1.conv1.weight":[[8,8]],
    "ResNet::layer4.1.conv1.bias":[[8,6]],
    "ResNet::layer4.1.conv2.weight":[[8,8]],
    "ResNet::layer4.1.conv2.bias":[[8,5]],
    "ResNet::fc.weight":[[8,8]],
    "ResNet::fc.bias":[[8,11]]
  },
  "output":
  {
    "ResNet::input_0":[[8,5]],
    "ResNet::ResNet/ReLU[relu]/2674":[[8,5]],
    "ResNet::ResNet/MaxPool2d[maxpool]/input.7":[[8,5]],
    "ResNet::ResNet/Sequential[layer1]/BasicBlock[0]/ReLU[relu]/input.13":[[8,5]],
    "ResNet::ResNet/Sequential[layer1]/BasicBlock[0]/Conv2d[conv2]/input.15":[[8,5]],
    "ResNet::ResNet/Sequential[layer1]/BasicBlock[0]/ReLU[relu]/input.19":[[8,5]],
    "ResNet::ResNet/Sequential[layer1]/BasicBlock[1]/ReLU[relu]/input.25":[[8,5]],
    "ResNet::ResNet/Sequential[layer1]/BasicBlock[1]/Conv2d[conv2]/input.27":[[8,5]],
    "ResNet::ResNet/Sequential[layer1]/BasicBlock[1]/ReLU[relu]/input.31":[[8,5]],
    "ResNet::ResNet/Sequential[layer2]/BasicBlock[0]/ReLU[relu]/input.37":[[8,5]],
    "ResNet::ResNet/Sequential[layer2]/BasicBlock[0]/Conv2d[conv2]/input.39":[[8,5]],
    "ResNet::ResNet/Sequential[layer2]/BasicBlock[0]/Sequential[downsample]/Conv2d[0]/input.41":[[8,6]],
    "ResNet::ResNet/Sequential[layer2]/BasicBlock[0]/ReLU[relu]/input.45":[[8,5]],
    "ResNet::ResNet/Sequential[layer2]/BasicBlock[1]/ReLU[relu]/input.51":[[8,5]],
    "ResNet::ResNet/Sequential[layer2]/BasicBlock[1]/Conv2d[conv2]/input.53":[[8,5]],
    "ResNet::ResNet/Sequential[layer2]/BasicBlock[1]/ReLU[relu]/input.57":[[8,5]],
    "ResNet::ResNet/Sequential[layer3]/BasicBlock[0]/ReLU[relu]/input.63":[[8,5]],
    "ResNet::ResNet/Sequential[layer3]/BasicBlock[0]/Conv2d[conv2]/input.65":[[8,5]],
    "ResNet::ResNet/Sequential[layer3]/BasicBlock[0]/Sequential[downsample]/Conv2d[0]/input.67":[[8,7]],
    "ResNet::ResNet/Sequential[layer3]/BasicBlock[0]/ReLU[relu]/input.71":[[8,5]],
    "ResNet::ResNet/Sequential[layer3]/BasicBlock[1]/ReLU[relu]/input.77":[[8,5]],
    "ResNet::ResNet/Sequential[layer3]/BasicBlock[1]/Conv2d[conv2]/input.79":[[8,5]],
    "ResNet::ResNet/Sequential[layer3]/BasicBlock[1]/ReLU[relu]/input.83":[[8,5]],
    "ResNet::ResNet/Sequential[layer4]/BasicBlock[0]/ReLU[relu]/input.89":[[8,5]],
    "ResNet::ResNet/Sequential[layer4]/BasicBlock[0]/Conv2d[conv2]/input.91":[[8,5]],
    "ResNet::ResNet/Sequential[layer4]/BasicBlock[0]/Sequential[downsample]/Conv2d[0]/input.93":[[8,6]],
    "ResNet::ResNet/Sequential[layer4]/BasicBlock[0]/ReLU[relu]/input.97":[[8,5]],
    "ResNet::ResNet/Sequential[layer4]/BasicBlock[1]/ReLU[relu]/input.103":[[8,4]],
    "ResNet::ResNet/Sequential[layer4]/BasicBlock[1]/Conv2d[conv2]/input.105":[[8,3]],
    "ResNet::ResNet/Sequential[layer4]/BasicBlock[1]/ReLU[relu]/input":[[8,3]],
    "ResNet::ResNet/AdaptiveAvgPool2d[avgpool]/3211":[[8,4]],
    "ResNet::ResNet/Linear[fc]/3215":[[8,2]]
  },
  "input":
  {

  },
  "fast_finetuned":false,
  "bias_corrected":true,
  "version":"3.0.0+a44284e+torch1.12.1"
}
Evaluating Accuracy Degradation due to Quantization
Evaluate the quantized model using ImageNet:
cd ..
python resnet18_quant.py --model_dir model --data_dir imagenet-mini --quant_mode test
Result: top-1 / top-5 accuracy: 69.1308 / 88.7076
The pre-quantized accuracy was: top-1 / top-5 accuracy: 69.9975 / 88.7586
This indicates accuracy degradation of less than 1%, which is quite good for Post-Training Quantization (PTQ).
Convert the model into .xmodel format for KV260 deployment:
python resnet18_quant.py --quant_mode test --subset_len 1 --batch_size=1 --model_dir model --data_dir imagenet-mini --deploy
Cross-compilation for DPU Execution
Cross-compile the generated ResNet_int.xmodel for DPU execution. For MPSoC targets, the IP information must be available at /opt/vitis_ai/compiler/arch/DPUCZDX8G:
cd /workspace/resnet18
vai_c_xir -x quantize_result/ResNet_int.xmodel -a /opt/vitis_ai/compiler/arch/DPUCZDX8G/<Target ex:KV260>/arch.json -o resnet18_pt -n resnet18_pt
Next, create a file named resnet18_pt.prototxt containing input quantization parameters. Adjust mean and scale values under the kernel section as needed:
model {
   name : "resnet18_pt"
   kernel {
         name: "resnet18_pt_0"
         mean: 103.53
         mean: 116.28
         mean: 123.675
         scale: 0.017429
         scale: 0.017507
         scale: 0.01712475
   }
   model_type : CLASSIFICATION
   classification_param {
          top_k : 5
          test_accuracy : false
          preprocess_type : VGG_PREPROCESS
   }
}
For clarity, the quantization formula used is:
Quantization:
\[x_{\text{quant}} = \operatorname{round}\Bigl(\frac{x_{\text{real}}}{s}\Bigr) + z\]Dequantization:
\[x_{\text{real}} = (x_{\text{quant}} - z) \times s\]where
- xreal is the original real value.
- xquant is the quantized integer value.
- s is the scale factor.
- z is the zero point.
- round(·) denotes the rounding operation.
The model is now fully INT8 quantized!
(Note added 8/18: mean and scale here are defined per channel in BGR order, not RGB.)
https://github.com/Xilinx/Vitis-AI/blob/3.0/examples/vai_library/samples/classification/test_jpeg_classification_squeezenet.cpp#L98-L99
Model Deployment on KV260
Transfer the generated quantization files to KV260:
scp -r resnet18_pt root@[TARGET_IP_ADDRESS]:/usr/share/vitis_ai_library/models/
Evaluation images/videos:
[Docker] $ cd /workspace
[Docker] $ wget https://www.xilinx.com/bin/public/openDownload?filename=vitis_ai_library_r3.0.0_images.tar.gz -O vitis_ai_library_r3.0.0_images.tar.gz
[Docker] $ wget https://www.xilinx.com/bin/public/openDownload?filename=vitis_ai_library_r3.0.0_video.tar.gz -O vitis_ai_library_r3.0.0_video.tar.gz
[Docker] $ scp -r vitis_ai_library_r3.0.0_images.tar.gz root@[TARGET_IP_ADDRESS]:~/
[Docker] $ scp -r vitis_ai_library_r3.0.0_video.tar.gz root@[TARGET_IP_ADDRESS]:~/
Extract on KV260:
[Target] $ tar -xzvf vitis_ai_library_r3.0.0_images.tar.gz -C ~/Vitis-AI/examples/vai_library/
[Target] $ tar -xzvf vitis_ai_library_r3.0.0_video.tar.gz -C ~/Vitis-AI/examples/vai_library/
Inference Execution
Classification Test Task
Execute the classification test application on KV260:
cd ~/Vitis-AI/vai_library/samples/classification
./build.sh
./test_jpeg_classification resnet18_pt ~/Vitis-AI/examples/vai_library/samples/classification/images/002.JPEG
Result indicates successful inference:
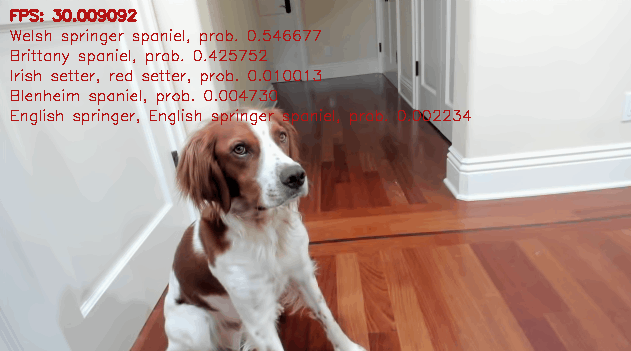
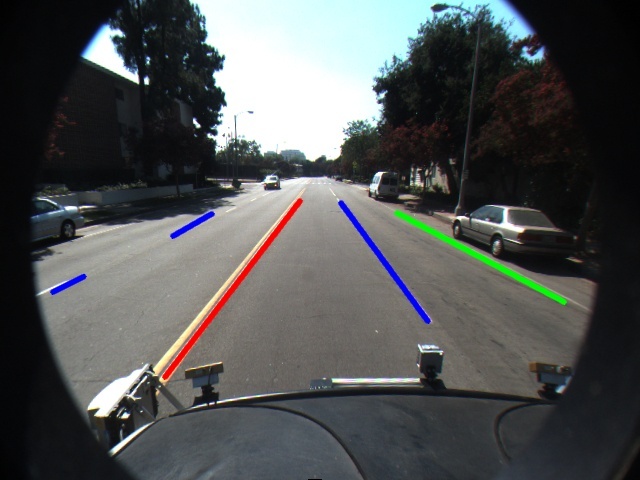
Lane Detection Task
Try additional sample models:
cd ../lanedetect
./build.sh
./test_jpeg_lanedetect vpgnet_pruned_0_99 sample_lanedetect.jpg
Successful execution:
Conclusion
We’ve reviewed the basic workflow for model quantization, deployment, and application execution. Using DPU IP on Zynq provides an experience similar to utilizing dedicated NPUs.